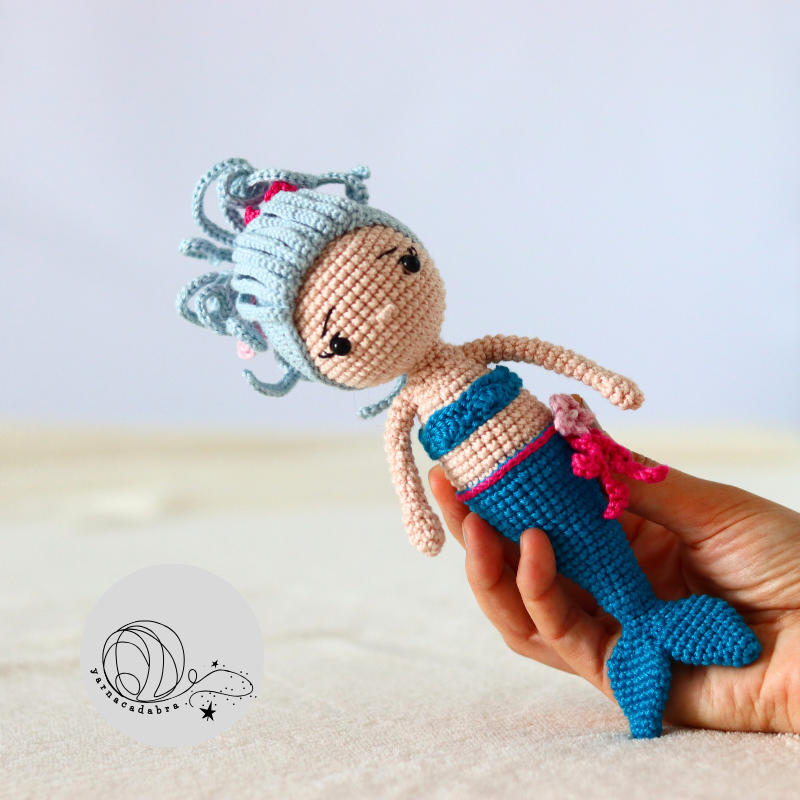
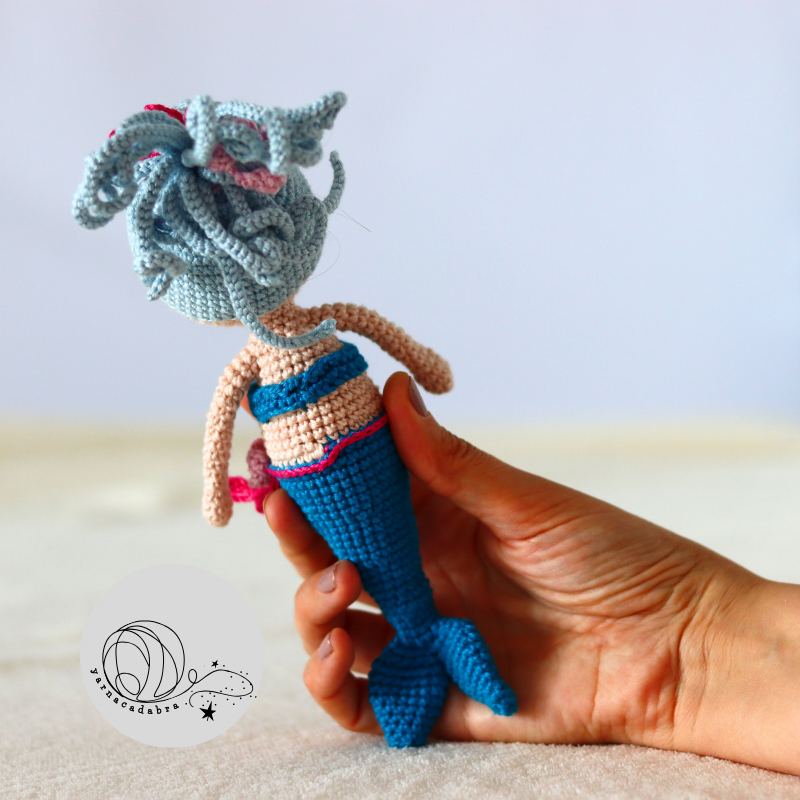
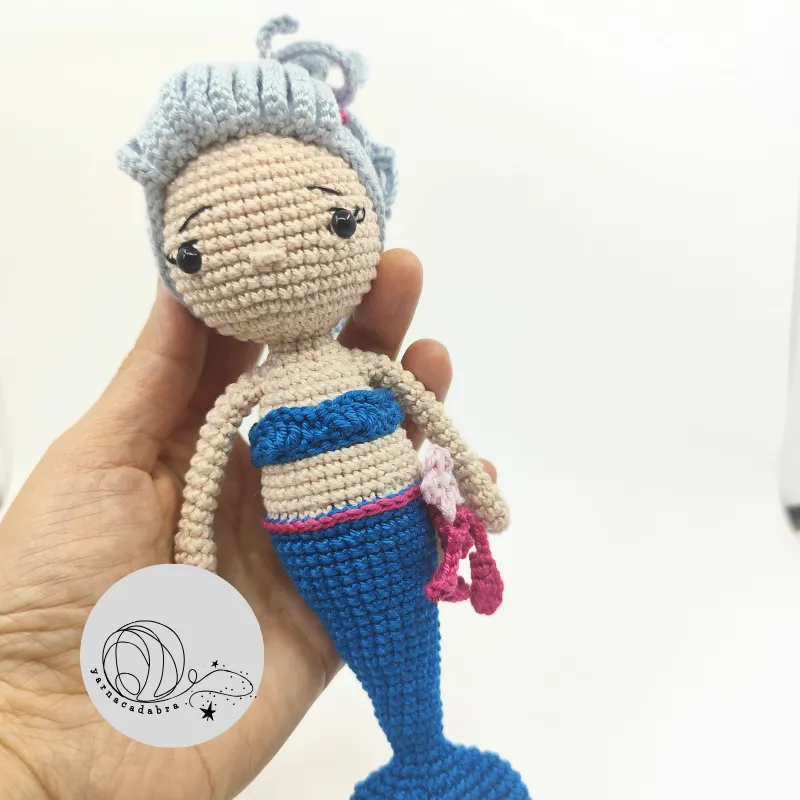
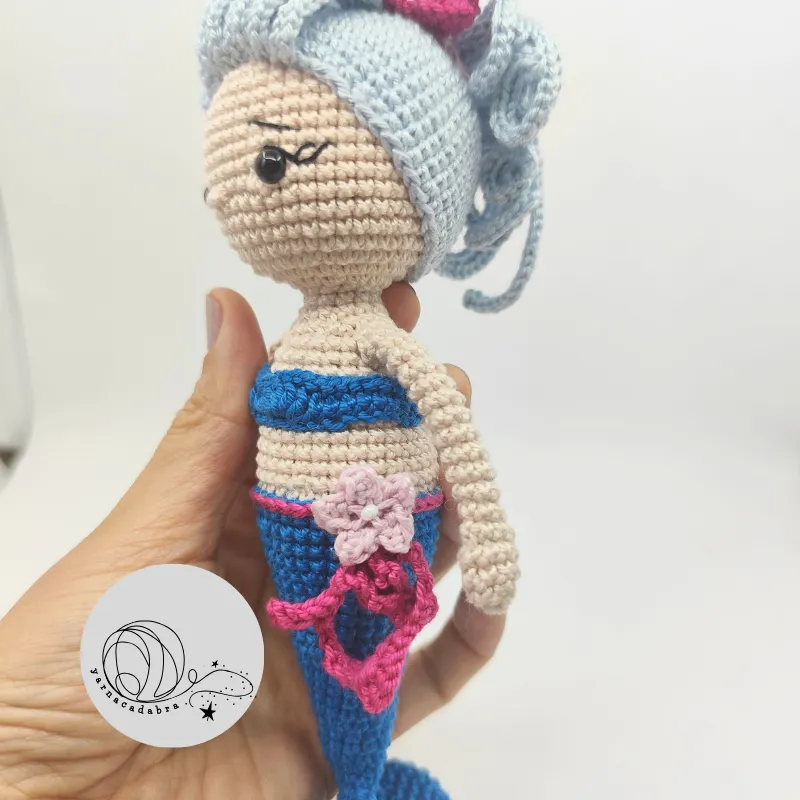
Free mermaid crochet pattern - Easy amigurumi tutorial for beginners
Have you ever dreamed of making a cute crochet mermaid? For years, I had this image in my head of a sweet, handcrafted mermaid, but I never quite got around to it. Well, this year, I finally made that dream a reality!
I designed my very own amigurumi mermaid, and I loved her so much that I wanted to share the experience. I hosted a Crochet-Along (CAL), and the response was absolutely incredible! More than 200 amazing crafters joined in to bring this little mermaid to life. Seeing all the different color combinations and happy faces was the highlight of my year.
The CAL was such a success, and the community we built was so inspiring, that I knew I had to share this pattern with everyone. So, I’m thrilled to release my free crochet mermaid pattern for you today!
Is This a Beginner Crochet Pattern?
This is the perfect project for an adventurous beginner! If you have a little bit of amigurumi experience, meaning you’re comfortable with the basics like a magic ring, single crochet, increases, and decreases, you can absolutely make this mermaid.
I designed this pattern to be as clear and straightforward as possible. However, if you get stuck on any part, please don’t hesitate to reach out! My goal is to help you successfully create a handmade toy you can be proud of.
The Perfect Quick Gift & Summer Crochet Project
Are you looking for a quick crochet gift idea for a little girl’s birthday? Or maybe a special present for a baby shower? This mermaid is your answer! She works up relatively fast and her charming design is guaranteed to make someone smile.
This is also a fantastic summer crochet project. You can work on it by the pool, at the beach, or on a lazy afternoon in the backyard.
Get Your Free Crochet Mermaid Pattern
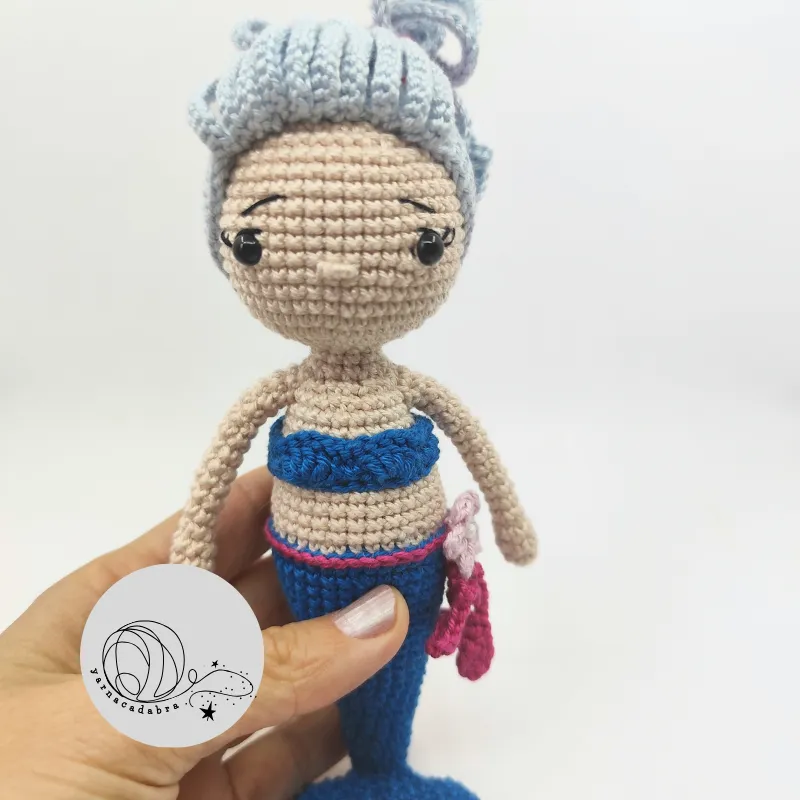
Ready to start hooking? This pattern includes step-by-step instructions to create the head, body, tail, arms, and beautiful hair.
What You'll Need
Catania (100% mercerized cotton, 50g/125m):
dark blue: 400, skin color: 263, light blue: 297, light pink: 246, dark pink: 114
Stuffing, needle, scissors
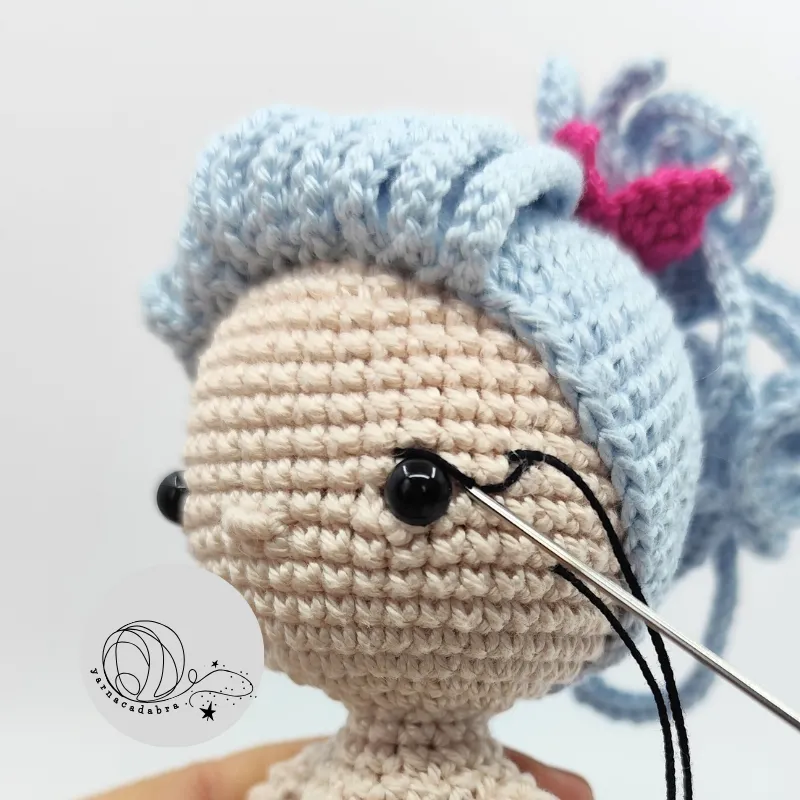
2 pcs 6 mm safety eyes
Abbreviations
ch - chain
sc - single crochet
hdc - half double crochet
sl st - slip stitch
inc - increase
dec - decrease
BLO – crochet in the back loop only
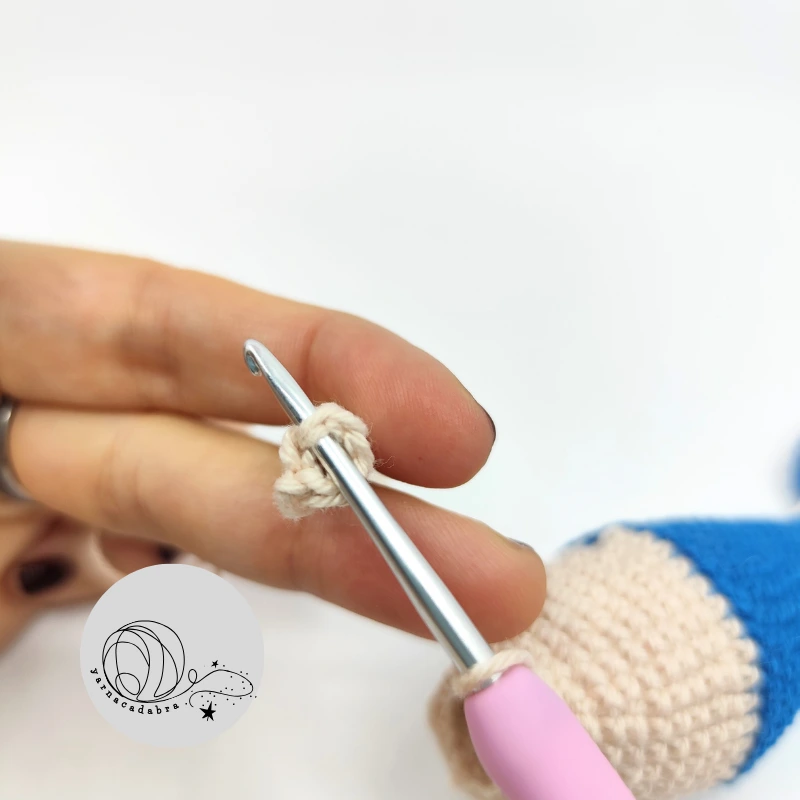
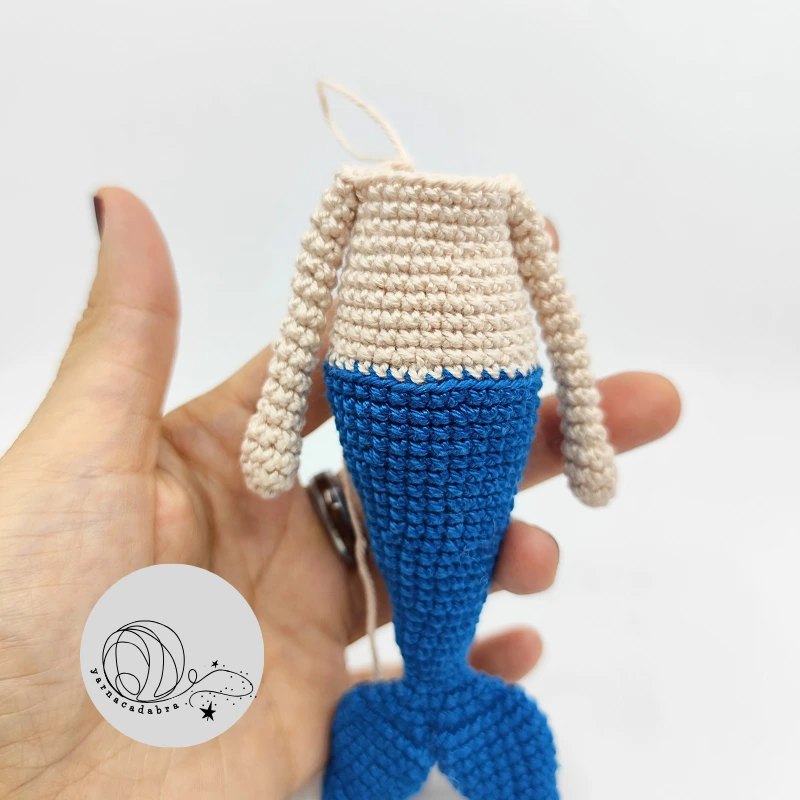
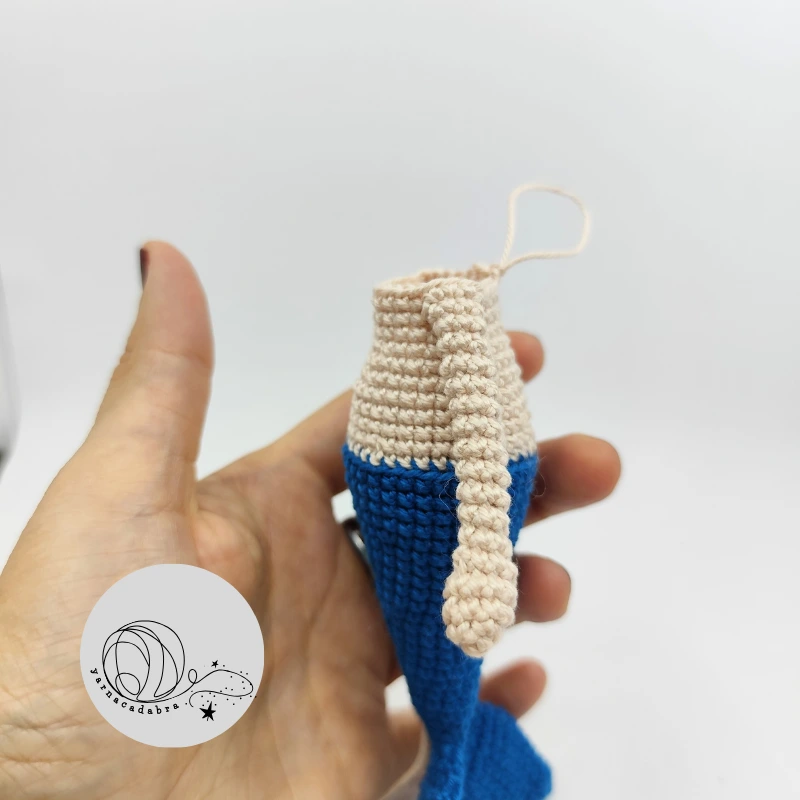
Arms - make 2 pieces
Start: with the color of the skin make a magic ring.
1. 6 sc into the magic ring (6)
2. (2 sc, inc)*2 (8)
3-4. sc into every st across (8) (2 rounds)
5. (2 sc, dec)*2 (6)
6-16. sc into every st across (6) (11 rounds)
Do not stuff the arms.
Cut the yarn, fasten off.
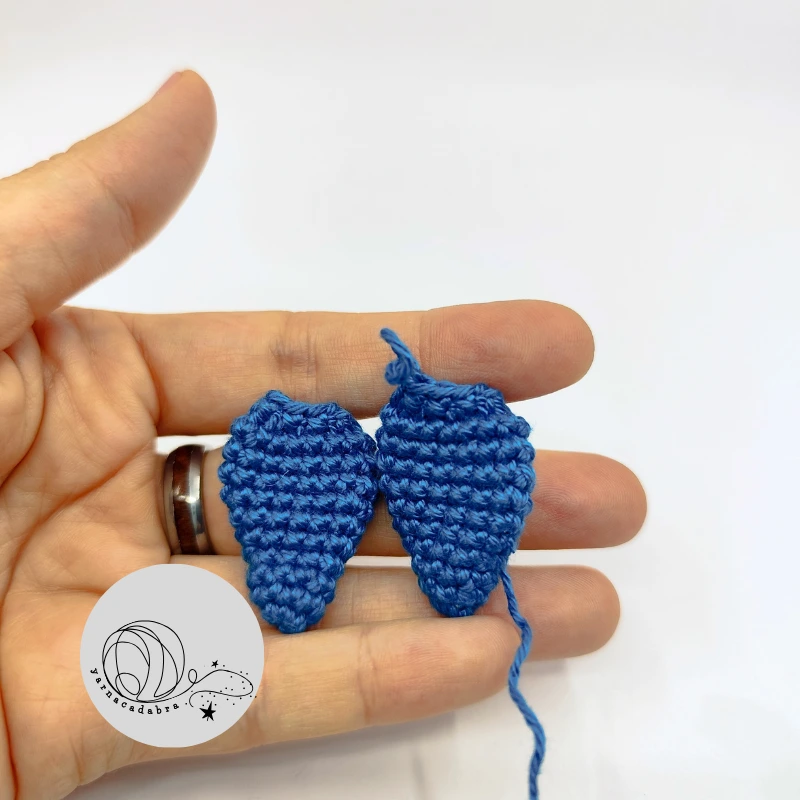
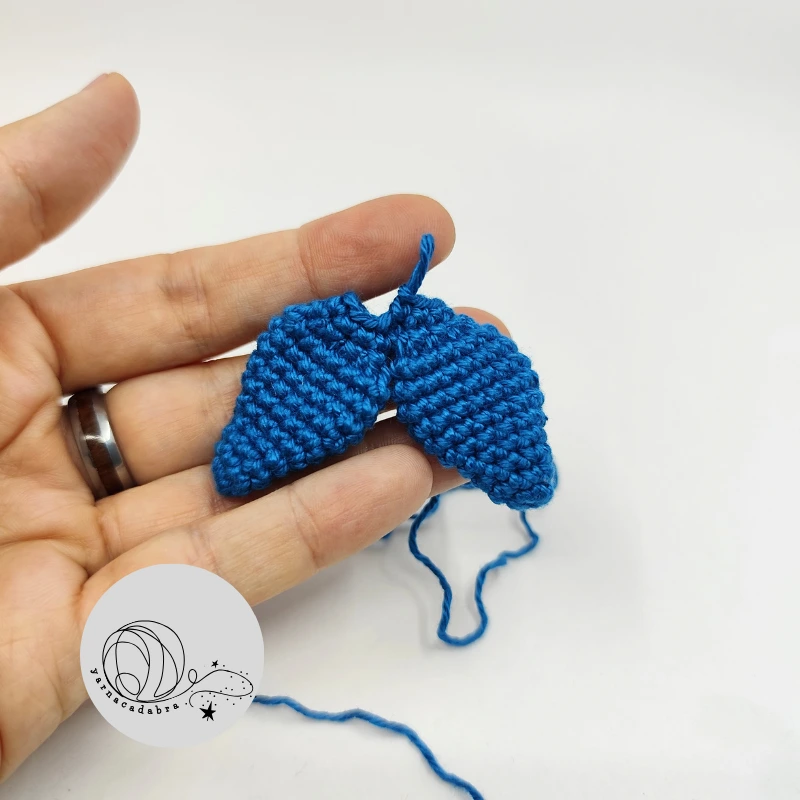
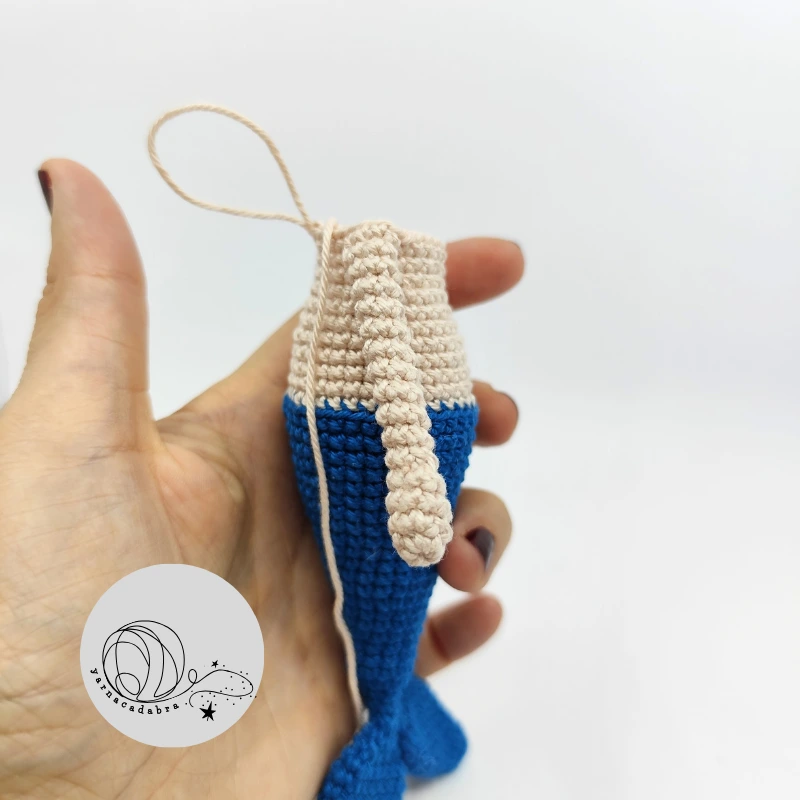
FINS - make 2 pieces
Start: with dark blue yarn make a magic ring.
1. 6 sc into the magic ring (6)
2. (2 sc, inc)*2 (8)
3. sc into every st across (8)
4. (3 sc, inc)*2 (10)
5. (4 sc, inc)*2 (12)
6. (5 sc, inc)*2 (14)
7. (6 sc, inc)*2 (16)
8-10. sc into every st across (16) (3 rounds)
11. dec*8 (8)
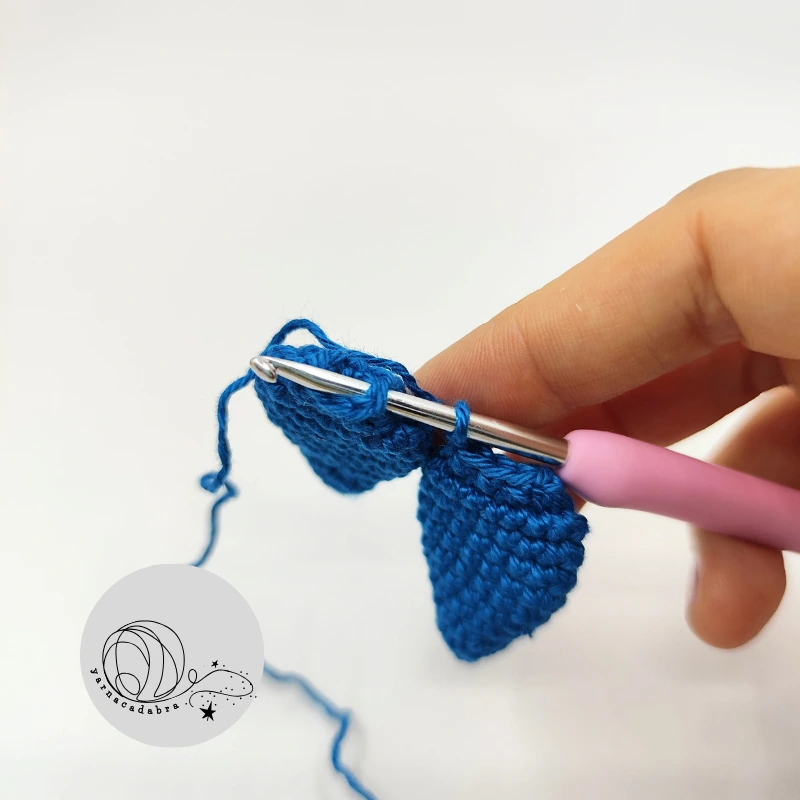
For the first fin, cut the yarn and fasten off. For the second fin, do not cut the yarn. Continue to join the fins and crochet the body.
Body
1. 8 sc on the fin, 8 sc on the other fin (16)
2. dec*8 (8)
3-4. sc into every st across (8) (2 rounds)
5. (sc, inc)*4 (12)
6-8. sc into every st across (12) (3 rounds)
9. (sc, inc, sc)*4 (16)
10-11. sc into every st across (16) (2 rounds)
12. (3 sc, inc)*4 (20)
13-14. sc into every st across (20) (2 rounds)
15. (2 sc, inc, 2 sc)*4 (24)
16-17. sc into every st across (24) (2 rounds)
18. (5 sc, inc)*4 (28)
19-20. sc into every st across (28) (2 rounds)
21. (3 sc, inc, 3 sc)*4 (32)
22-23. sc into every st across (32) (2 rounds)
24. (7 sc, inc)*4 (36)
25. sc into every st across (36)
Change color to the color of the skin, cut the blue yarn.
26. BLO sc into every st across (36)
27. (2 sc, dec, 2 sc)*6 (30)
28-30. sc into every st across (30) (3 rounds)
31. (13 sc, dec)*2 (28)
32. (6 sc, dec, 6 sc)*2 (26)
Stuff the body, continue stuffing as you go.
33. (11 sc, dec)*2 (24)
34. (5 sc, dec, 5 sc)*2 (22)
In the next round, attach the arms. Pay attention to symmetrical placement.
35. 4 sc, 2 sc crocheting through body and arm, 10 sc, 2 sc crocheting through body and arm, 4 sc (22)
Crochet at the outer curve of the arms.
36. 4 sc on the body, 4 sc on the outer stitches of the arm, 5 sc, dec, 3 sc on body, 4 sc on the outer stitches of the arm, 2 sc, dec on body (24)
37. (sc, dec)*8 (16)
38. (2 sc, dec)*4 (12)
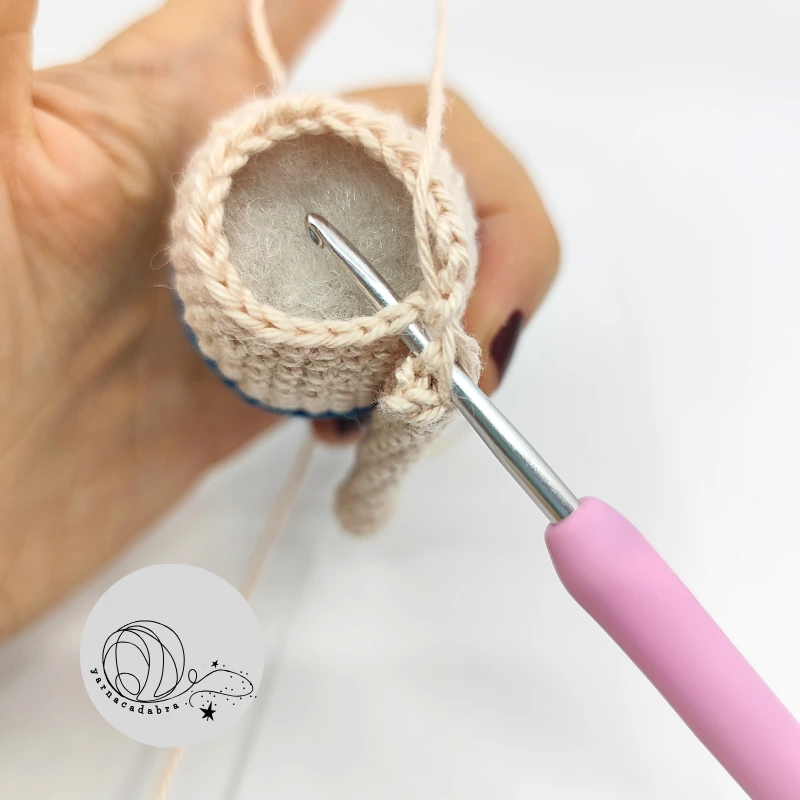
Continue with crocheting the head.
Head
1-2. sc into every st across (12) (2 rounds)
3. inc*12 (24)
4. (sc, inc)*12 (36)
5. (3 sc, inc)*9 (45)
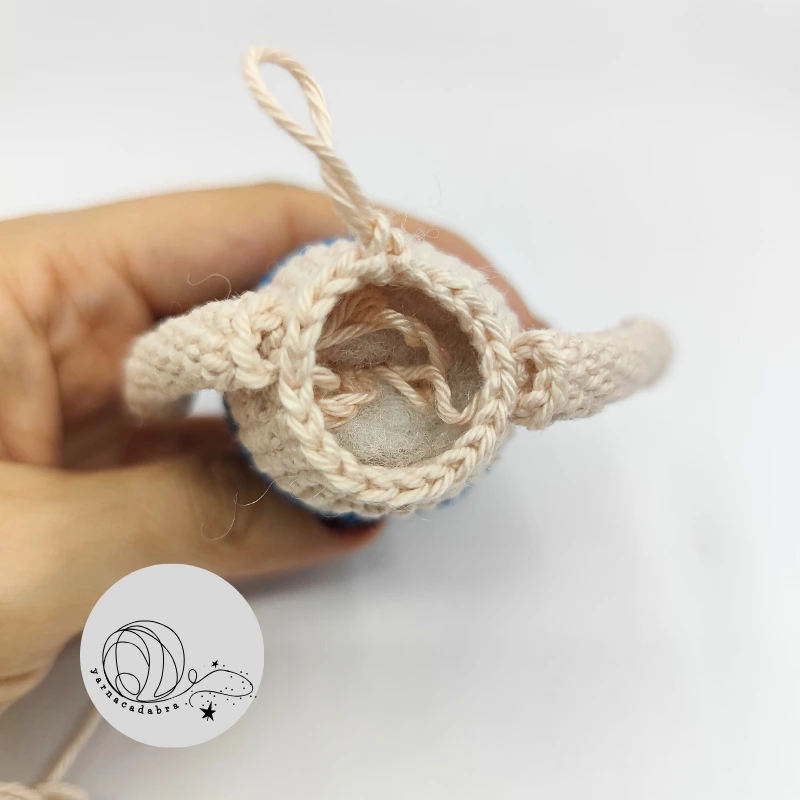
6-16. sc into every st across (45) (11 rounds)
Insert the safety eyes between rounds 10 and 11, with 10 stitches between them.
17. (7 sc, dec)*5 (40)
18. (4 sc, dec, 4 sc)*4 (36)
19. (2 sc, dec, 2 sc)*6 (30)
20. (3 sc, dec)*6 (24)
Stuff the head, continue stuffing as you go.
21. (sc, dec, sc)*6 (18)
22. (sc, dec)*6 (12)
23. dec*6 (6)
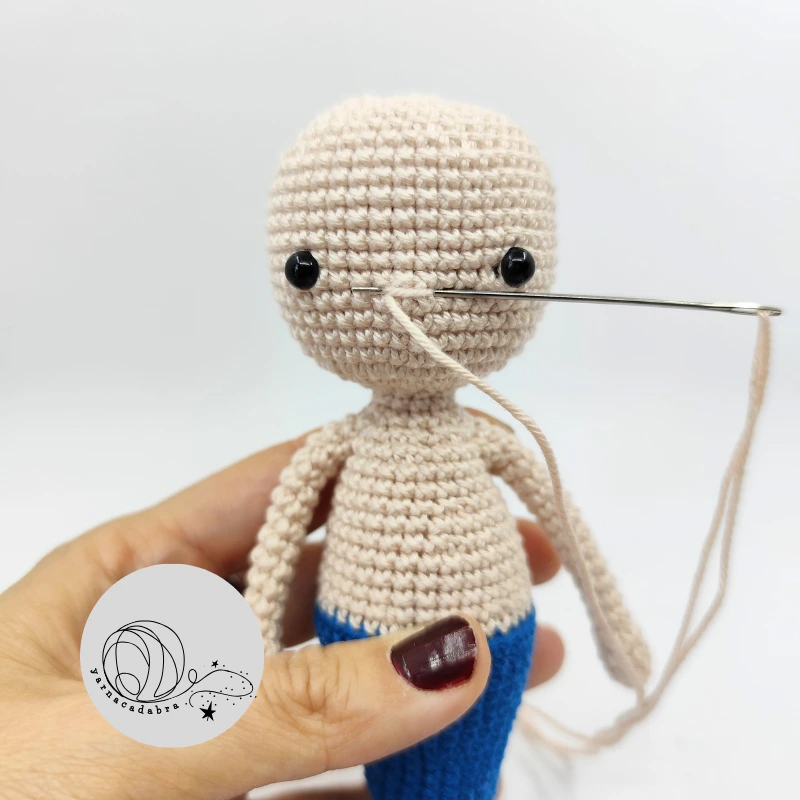
Fasten off, and weave in the ends.
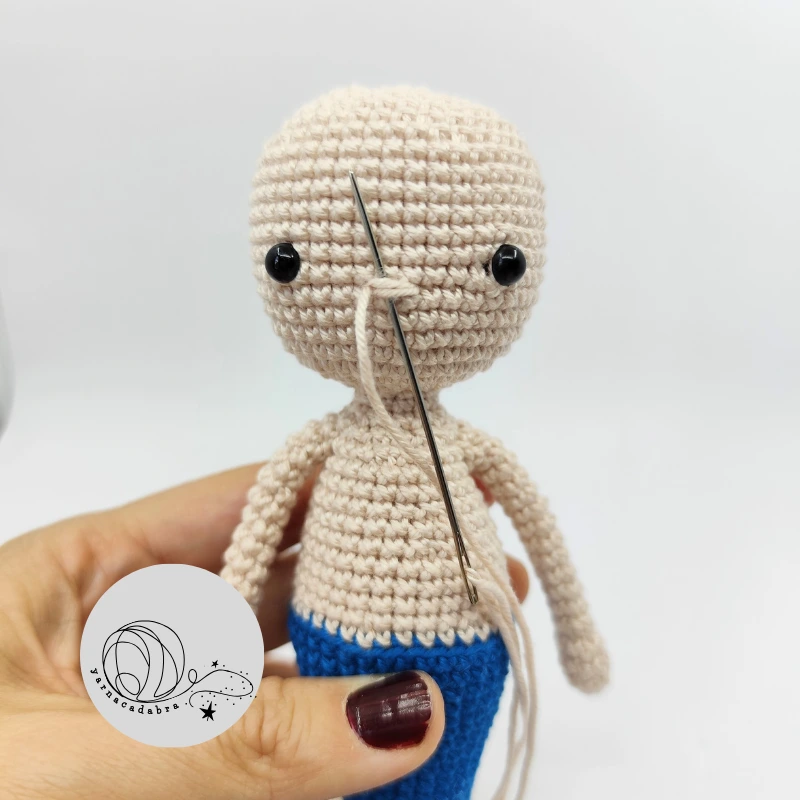
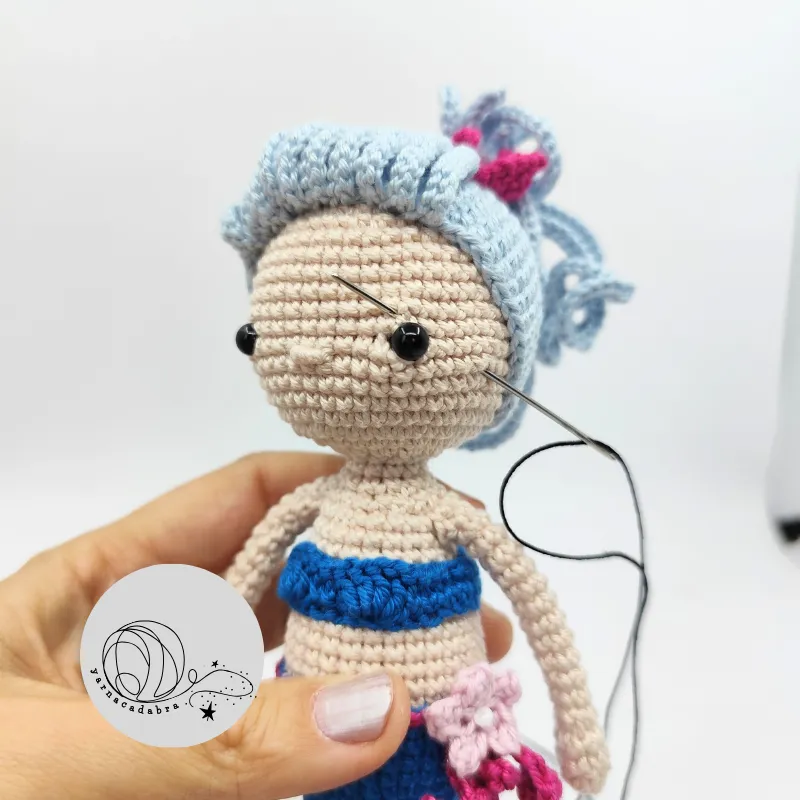
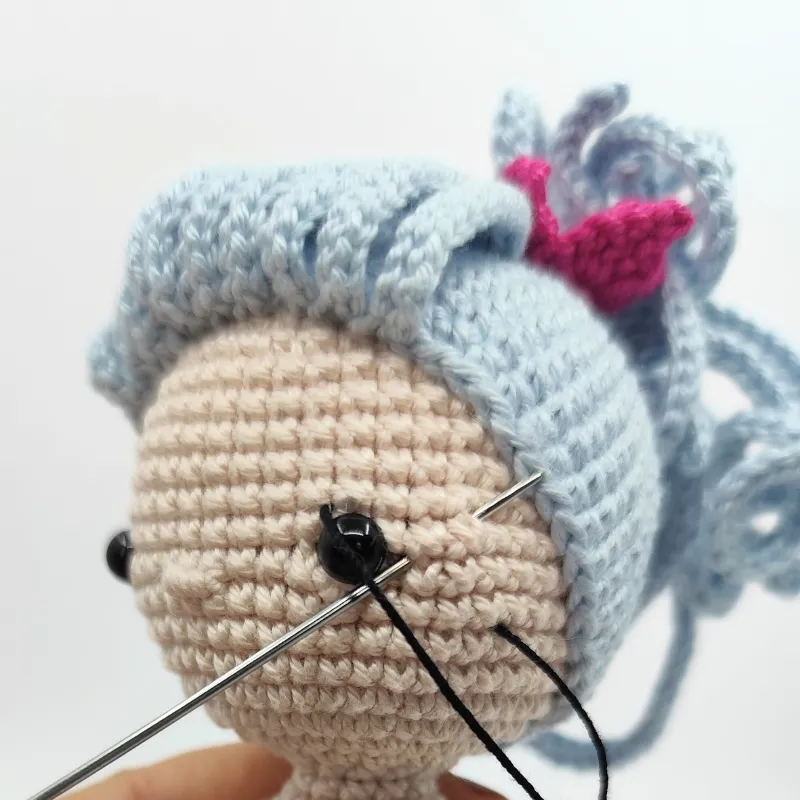
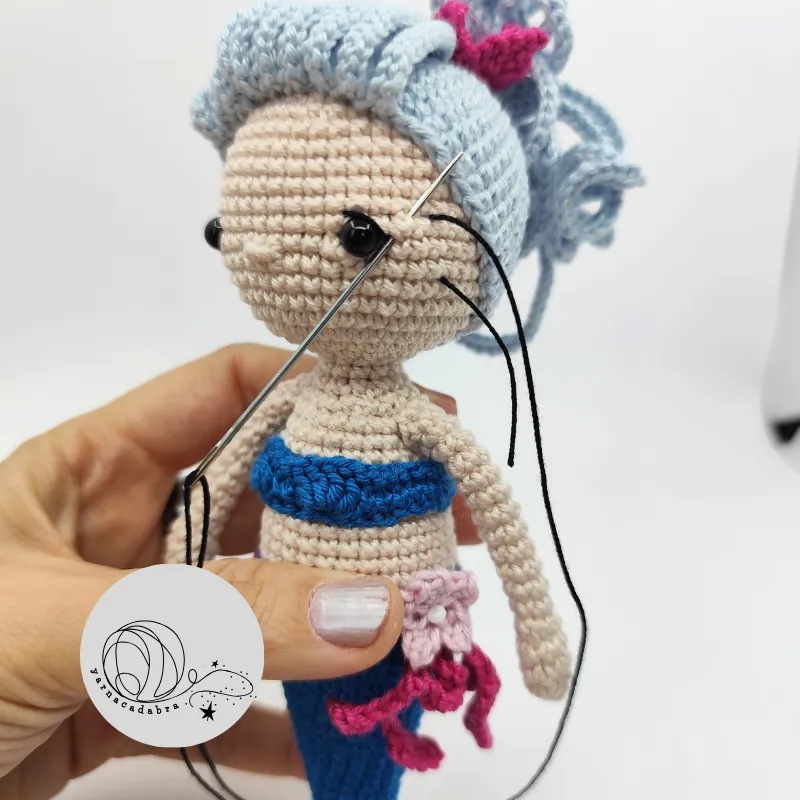
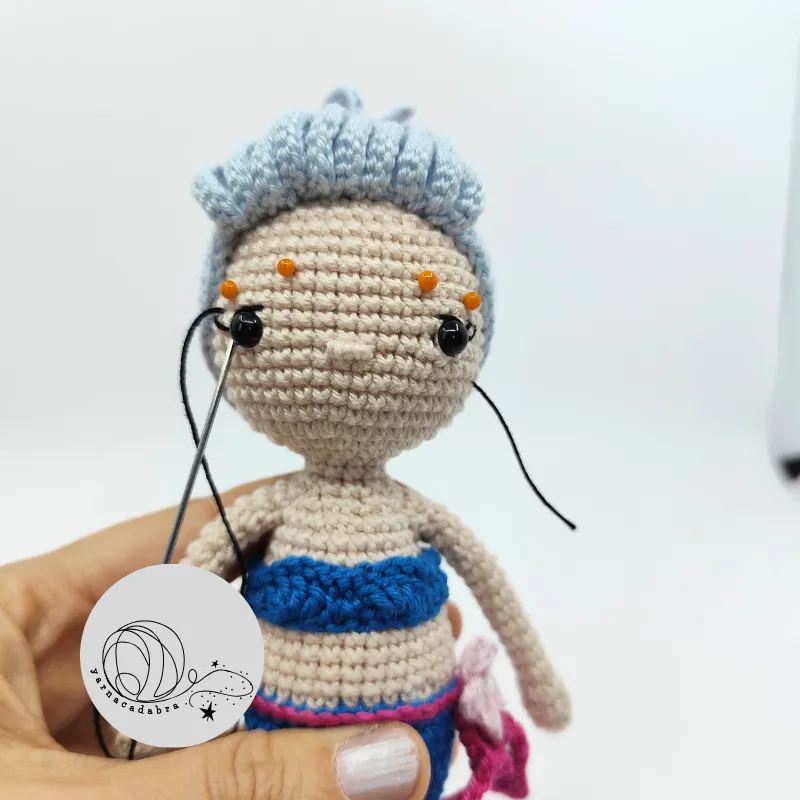
Embroider a nose between the eyes.

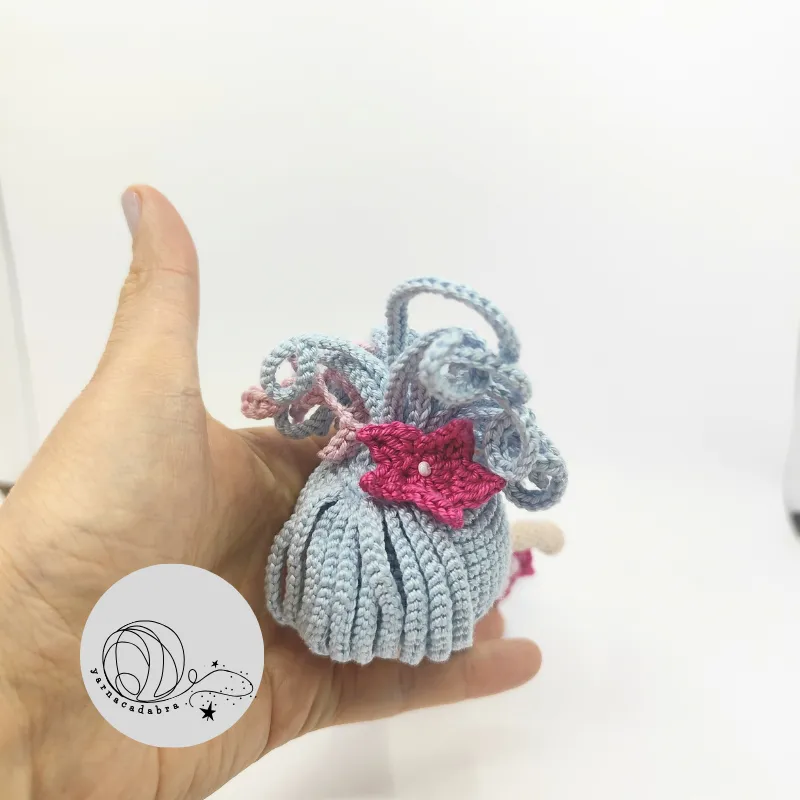
Hair
Start: with light blue yarn make a magic ring.
1. 6 sc into the magic ring (6)
2. inc*6 (12)
3. (sc, inc)*6 (18)
4. BLO (sc, inc, sc)*6 (24)
5. (3 sc, inc)*6 (30)
6. (2 sc, inc, 2 sc)*6 (36)
7. (5 sc, inc)*6 (42)
8. (3 sc, inc, 3 sc)*6 (48)
9-16. sc into every st across (48) (8 rounds)
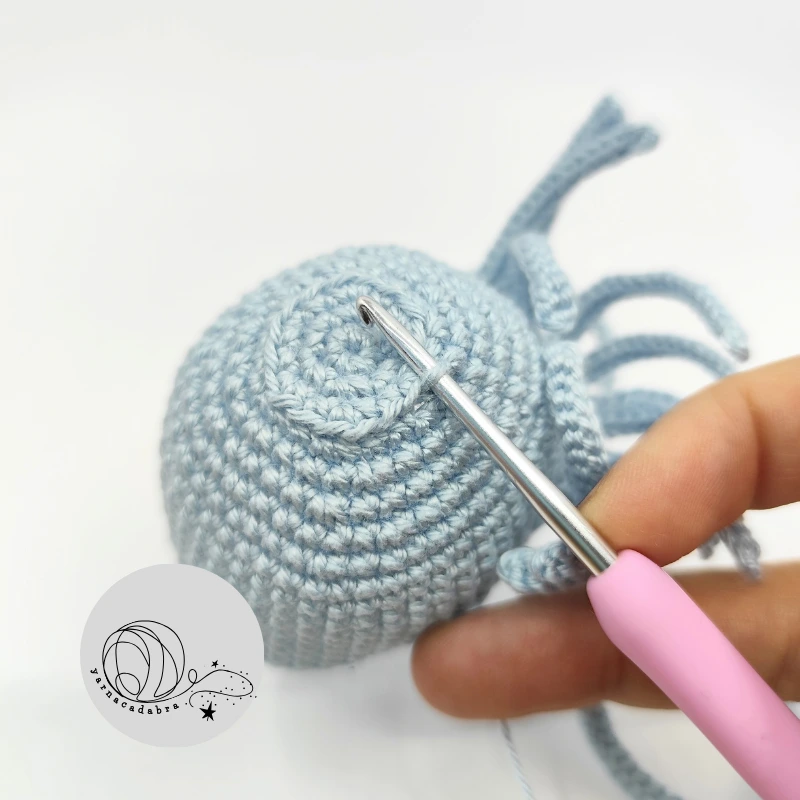
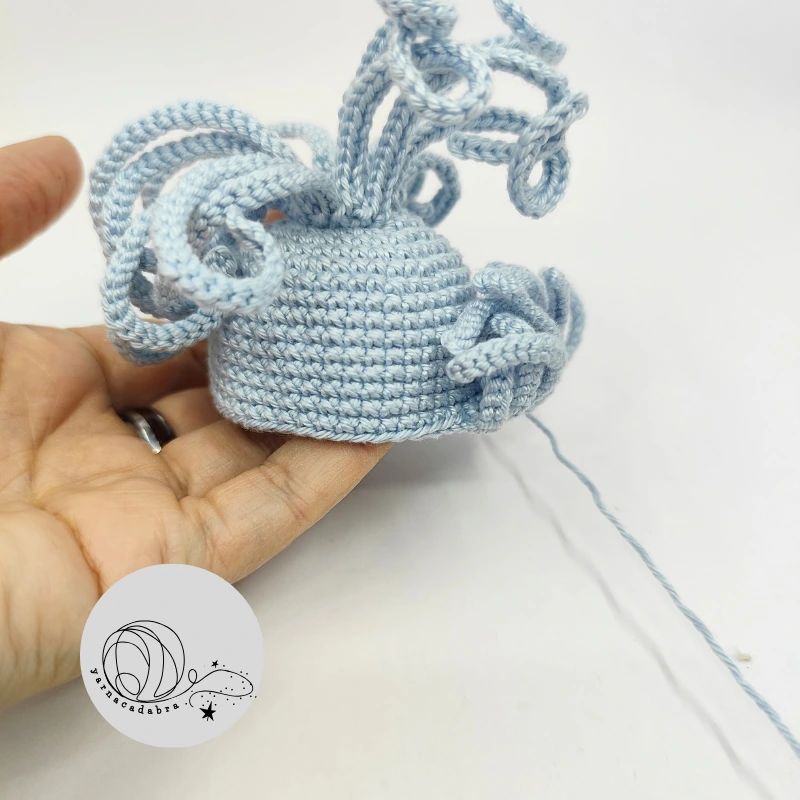
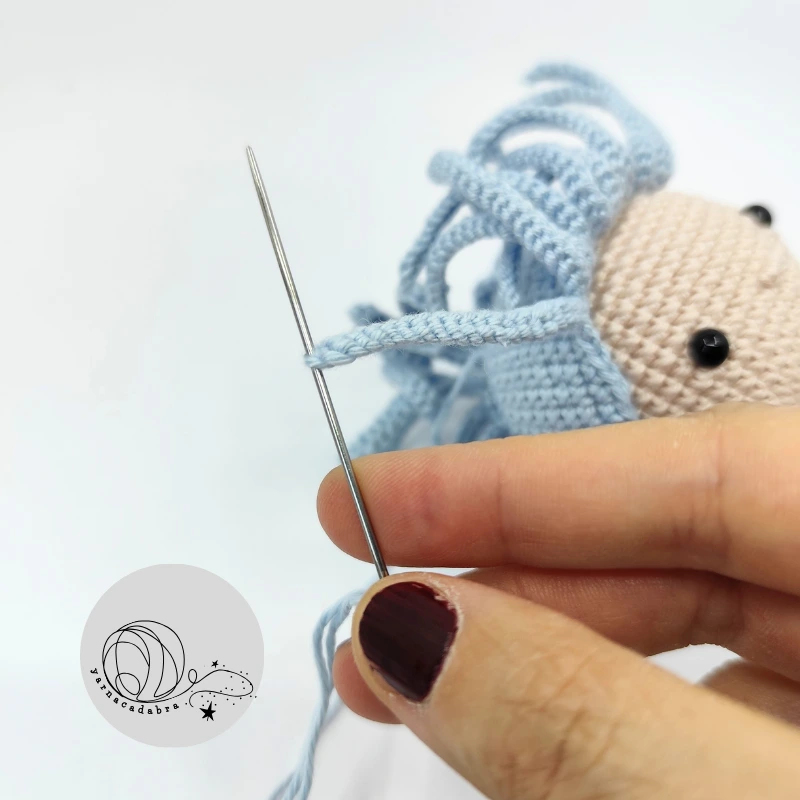
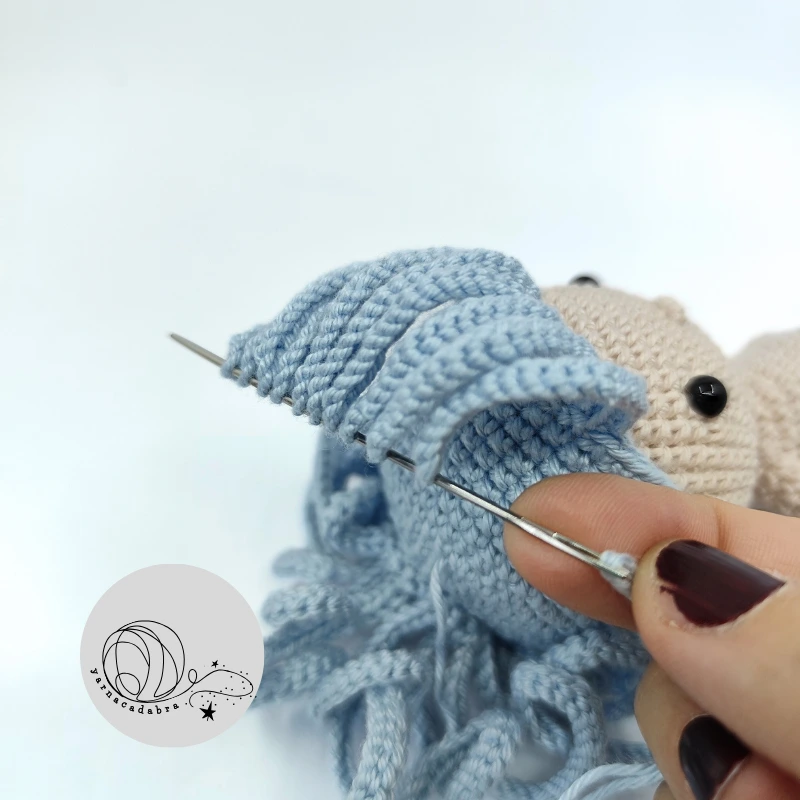
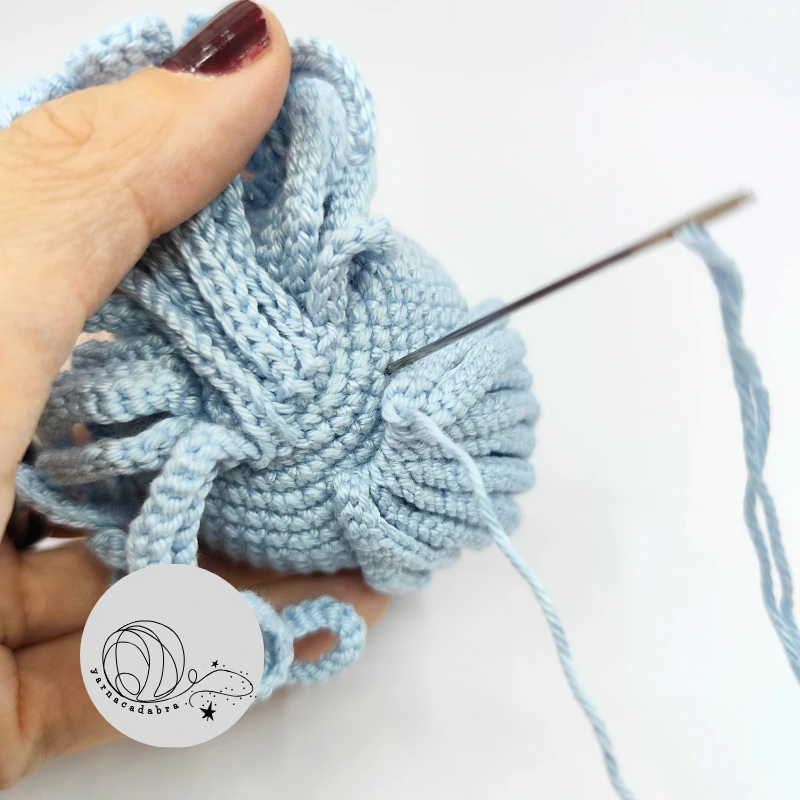
Make the curls.
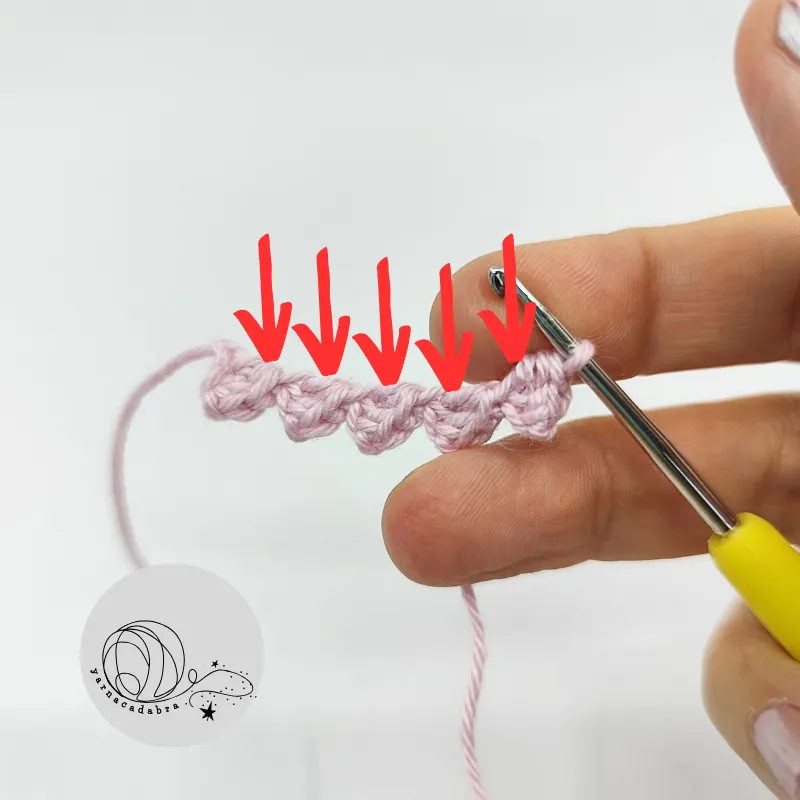
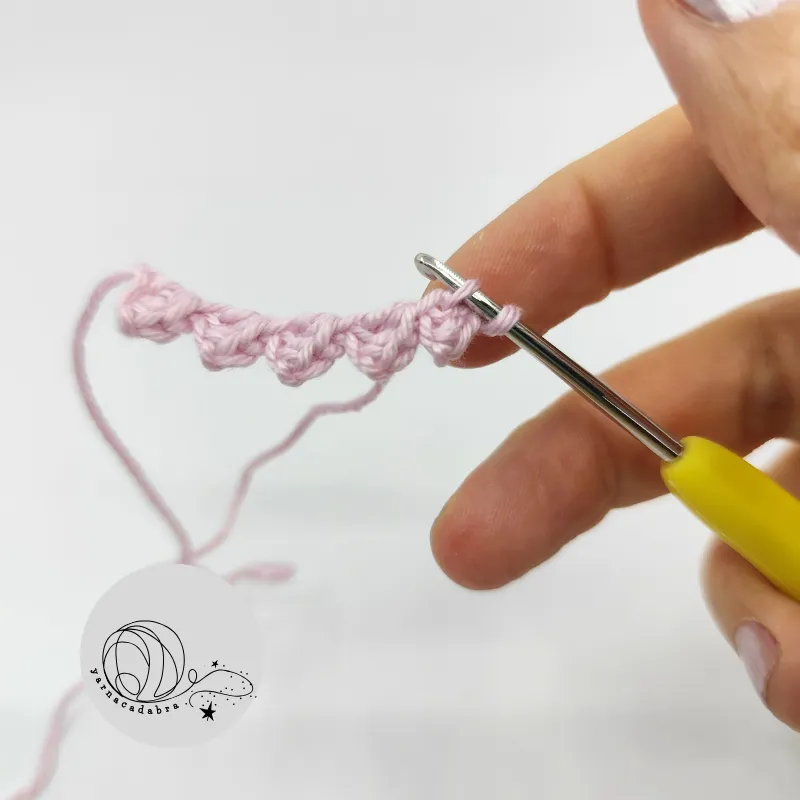
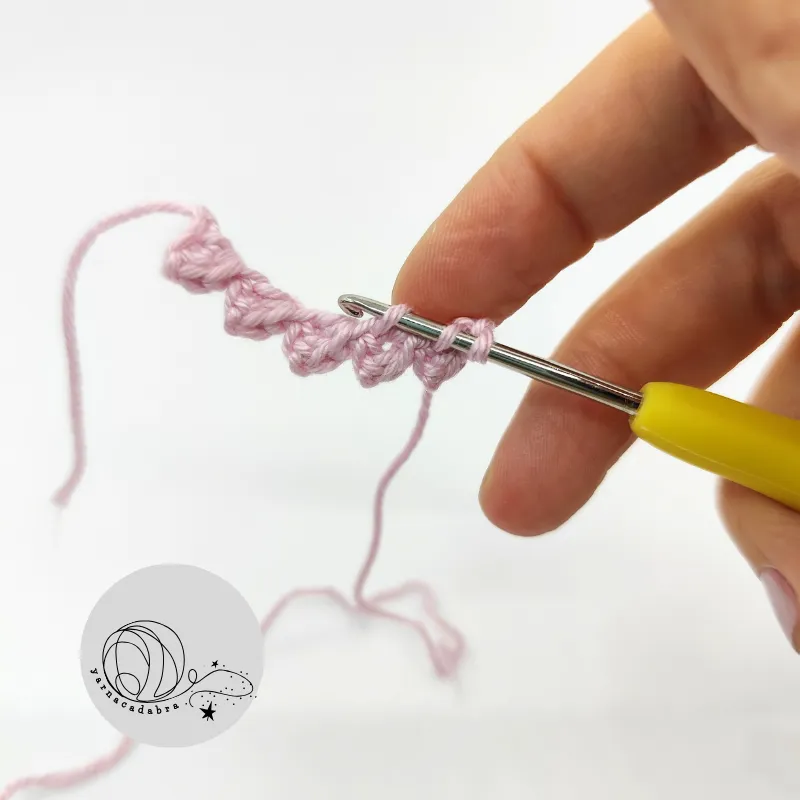
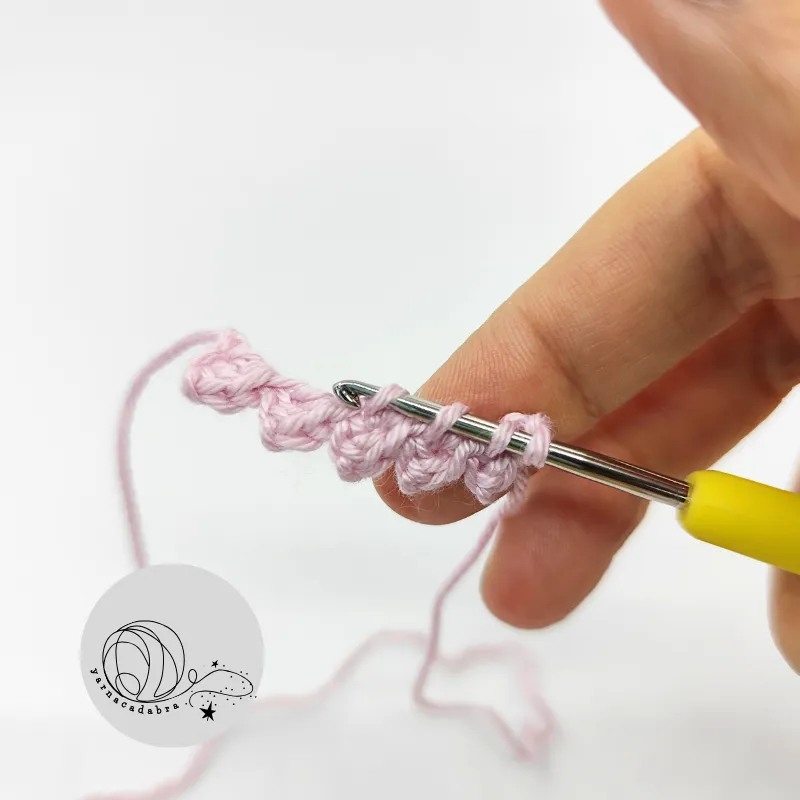
ch 21, turn, starting in the second ch from hook, sl st in each ch across, sl st in the next st on the base. Repeat from to * to make a total of 10 curls.
Pigtails
Join the light blue yarn to one of the front loops left free in round 3.
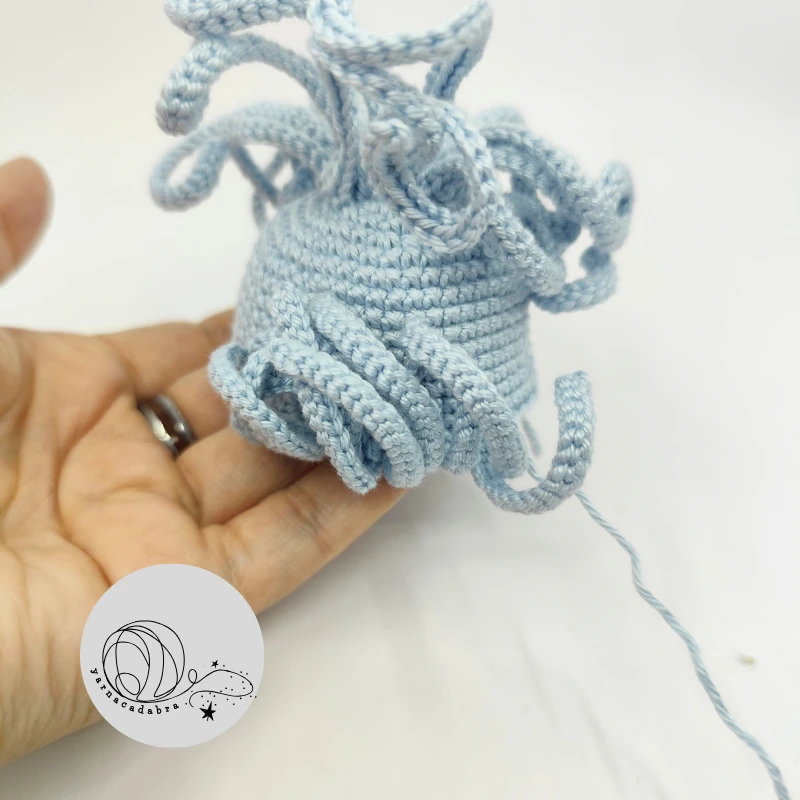
ch 31, turn, starting in the second ch from hook, sl st in each ch across, sl st in the next free front loop on the base. Repeat from to * in every free front loop around.
After finishing the second part, pin the hair to the head and then sew it on. The curls should be at the front. After sewing, thread the pigtails one by one onto a needle and tack them down onto the hair base.
HAIR DECORATION
Tie:
Start with light pink yarn.
ch 6, turn, starting in the 3rd ch from hook, hdc in the next 2 st, sc into the next 2 st
ch 8, turn, starting in the 3rd ch from hook, hdc in the next 2 st, sc in the next 2 ch Repeat from to 2 times, then ch 30,
ch 8, turn, starting in the 3rd ch from hook,hdc in the next 2 st, sc in the next 2 ch. Repeat from to * 3 times, sl st.
Cut the yarn, fasten off.
After finishing Part 2, tie it into the hair.
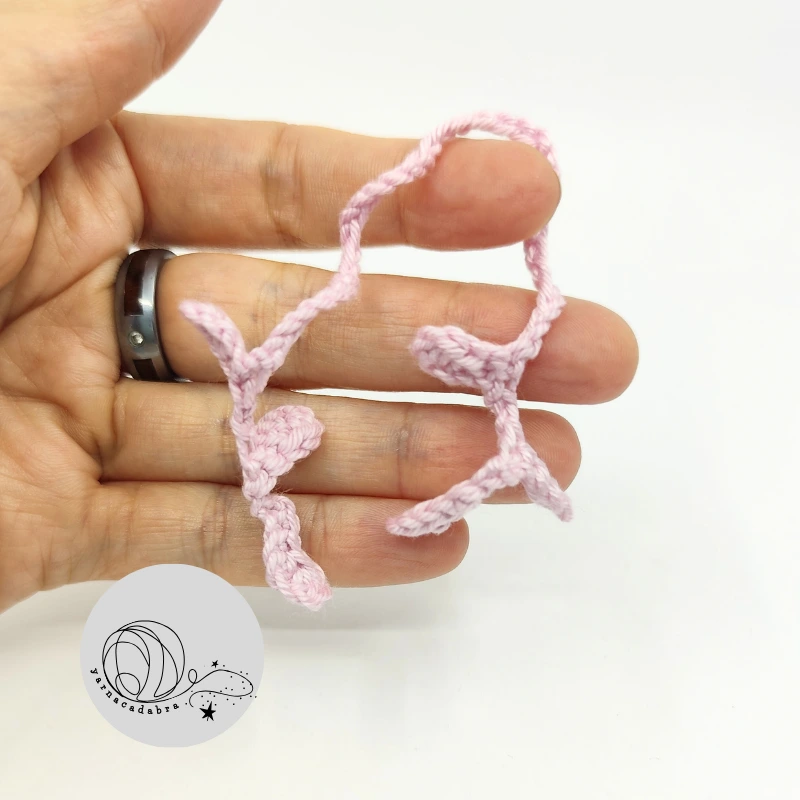
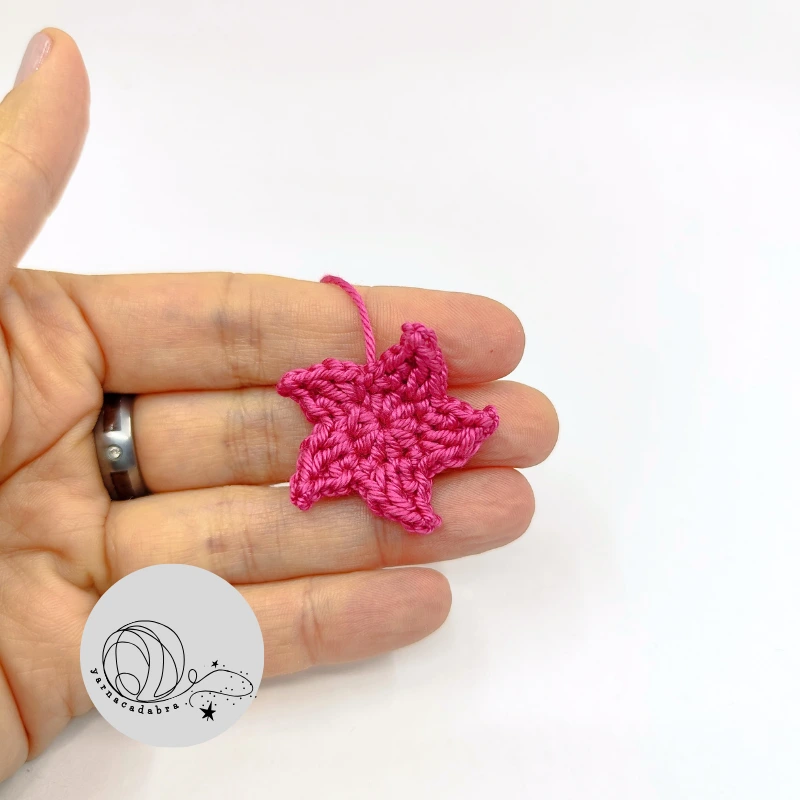
Star:
Start with dark pink yarn, make a magic ring.
1. ch 1, 10 hdc in the ring, join with a sl st to the first hdc (10)
2. ch 1, in the next st work (sc, ch 1, dc), make a picot (ch 3, turn, sl st in the first st), in the next st work (dc, ch 1, sc), repeat from to a total of 5 times, sl st.
Cut the yarn, leave a long tail for sewing.
After finishing Part 2, pin it to the head and sew it on.
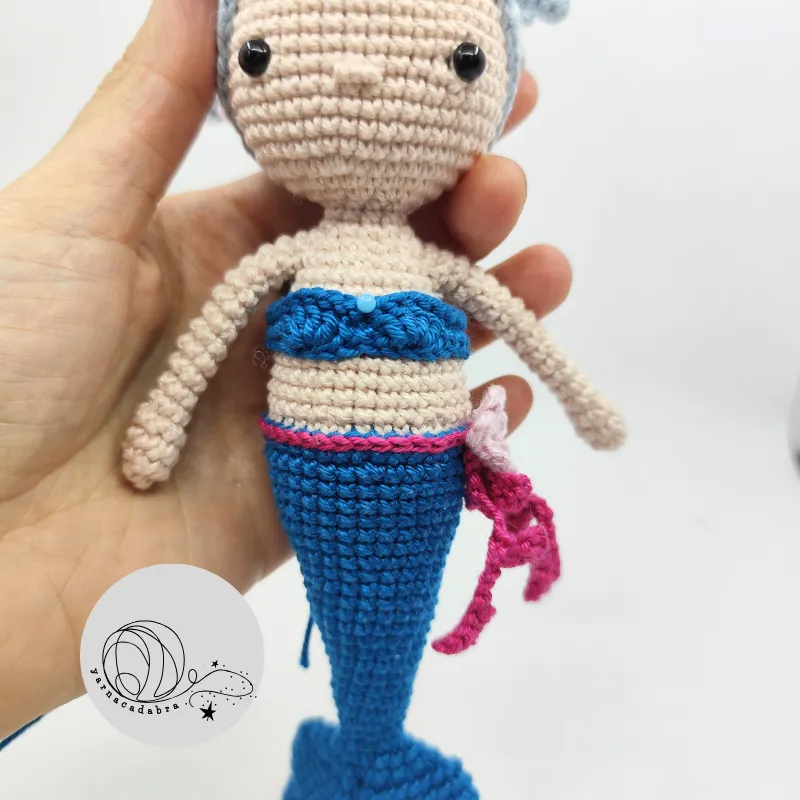
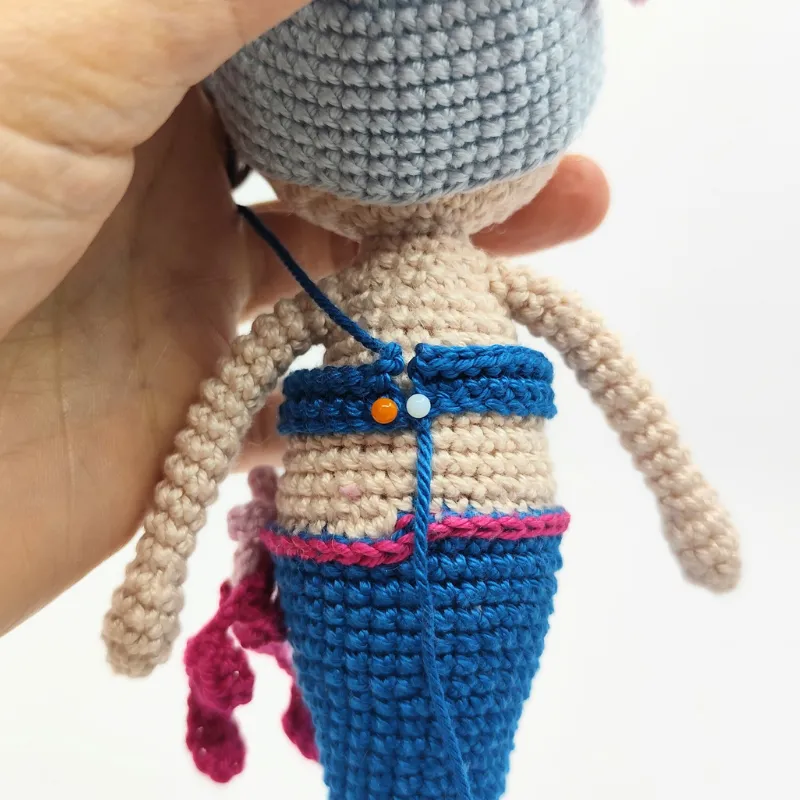
BRA TOP
Start: crochet with dark blue yarn.
ch 35, turn, start crocheting in the second ch from hook:
1. sc in the next 13 ch, skip 1 st, 4 dc in the next st, skip 1 st, sc in the next 2 st, skip 1 st, 4 dc in the next st, skip 1 st, sc in the next 13 st, ch 1, turn (36)
2. sl st in each st across (36)
Cut the yarn, leave a long tail for sewing.
After finishing Part 2, pin the bra top to the body, then sew it on.
Eye Embroidery
Belt
Start: Start with dark pink yarn.
ch 6, turn, work into the 3rd st from the hook hdc into the next 2 st, sc into the next 2 st,
ch 8, turn, work into the 3rd st from the hook, hdc into the next 2 st, sc into the next 2 st
Repeat from to 2 times.
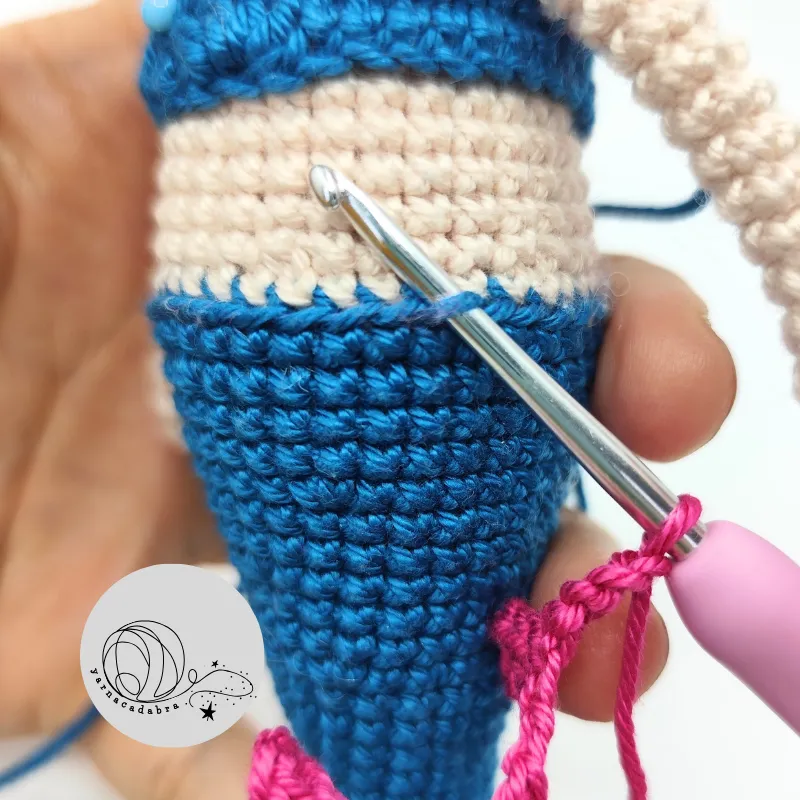
Crochet around the mermaid's waist into the free loops of the 25th rounds: sl st into every st across,
ch 8, turn, work into the 3rd st from the hook, hdc into the next 2 st, sc into the next 2 st Repeat from to 2 times.
Fasten off, and weave in the ends.
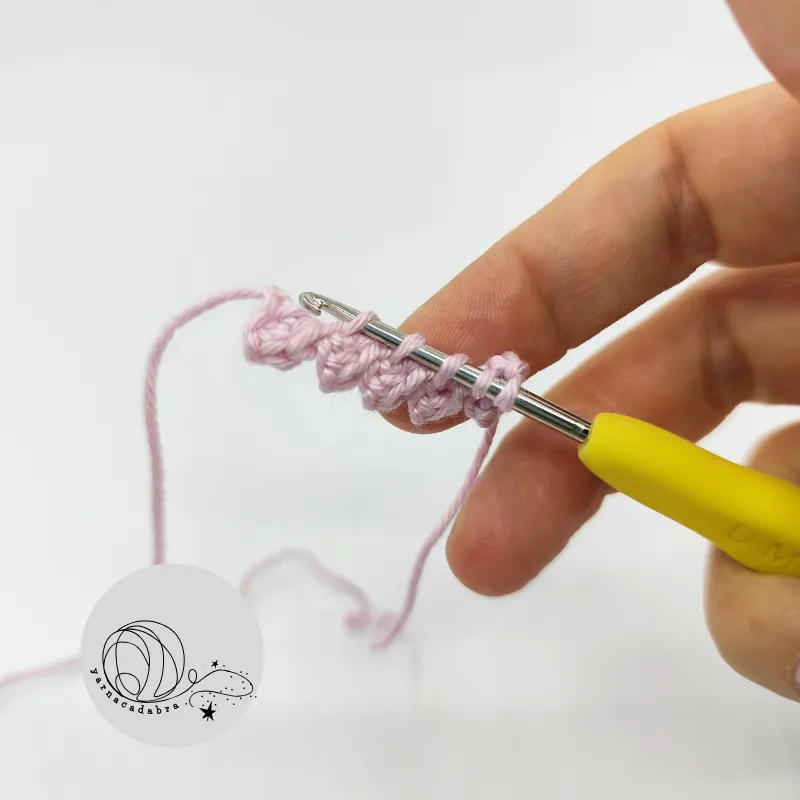
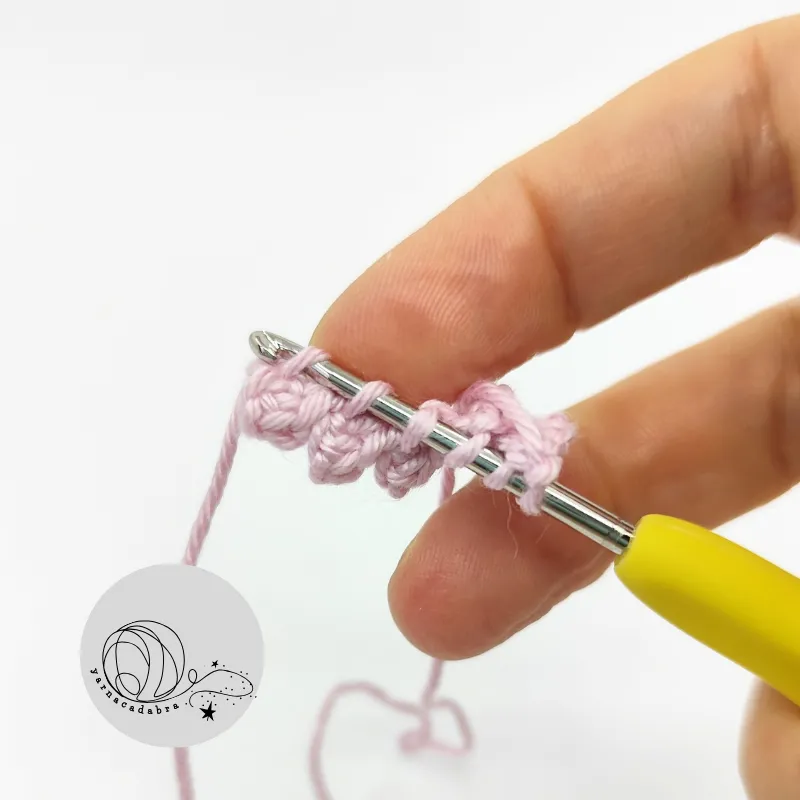
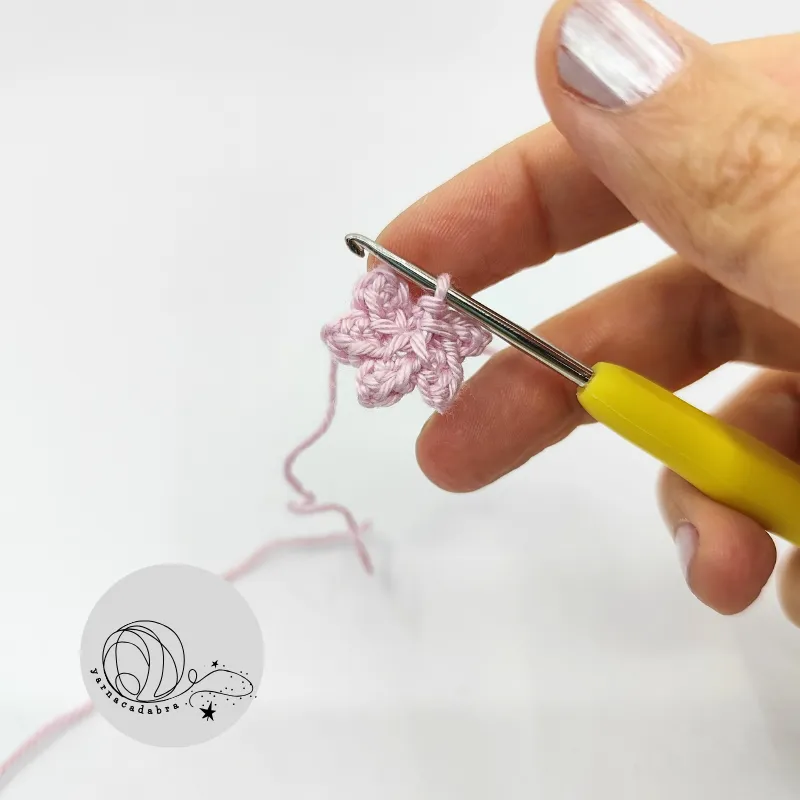
Star
Start: crochet with light pink yarn.
(ch 3, turn, sc, hdc)*5, ch 1, pull the yarn through the sides of all the hdc sides of the star, sl st to the side of the first hdc of the star.
Cut the yarn, leave a long tail for sewing.
Sew the star to the mermaid's waist, where you started crocheting the belt on the doll. Decorate the center with a white pearl.
Well done! You've completed your crochet project!
I hope you enjoyed crocheting your cute amigurumi, now it’s time to share your adorable creation with the world! Tag your photos with #yarnacadabra so we can all admire your work—your support means the world to me! 💛 If you have any questions, spot an error, or just want to say hi, feel free to reach out.
If you loved making this doll, check out my Patreon for more exclusive patterns and behind-the-scenes updates. Also, don’t forget to follow me on Instagram, Facebook, or Pinterest for more crochet inspiration and updates!
Happy crocheting! 😊
Zsuzsa