Figaro, the cat - FREE cat crochet pattern
.webp)
You’ve just found a cute and free cat crochet pattern! This pattern is great for beginners. My only advice is: if you're new to crochet, try not to use black yarn at first, as it can be hard to see. Start with a lighter color, and you’ll have great success making this small crocheted cat! :)
Are you a cat fan, or do you have a friend, kid, or friend’s kid who is? Let’s dive into this free crochet pattern and create a cute handcrafted cat gift! :)
Don’t forget: If the toy is made for children under 3 years, instead of using safety eyes, embroider them!
Materials and supplies
Size of the toy, crocheted with the recommended yarn is approximately 15 cm.
This toy was made of 100% mercerized cotton yarn, 50g/125m: Schachenmayr Catania Originals: white and pink for embroidering the details, and black.
crochet hook: size 2,5
2 pieces of 10 mm safety eyes
fiber filling, scissors, big tapestry needle for sewing details together
2 strands of chenille wire
Abbreviations
I use US terms in all my English crochet patterns.
ch - chain
sc - single crochet
sl st - slip stitch
inc - increase
dec - decrease
The toy is worked in continuous rounds – do not join after each round.
If you feel it is necessary, use stitch marker to follow the lines.
Using invisible decreases makes the toy more beautiful.
Head and body
Start: make a magic ring with black yarn.
1. 6 sc into a magic ring (6)
2. inc*6 (12)
3. (sc, inc)*6 (18)
4. (2 sc, inc)*6 (24)
5. (3 sc, inc)*6 (30)
6. 2 sc, inc, (4 sc, inc)*5, 2 sc (36)
7. (5 sc, inc)*6 (42)
8. 3 sc, inc, (6sc, inc)*5, 3 sc (48)
9. (7 sc, inc)*6 (54)
10-21. sc into every sts across (12 rows) (54)
22. (7 sc, dec)*6 (48)
23. 3 sc, dec, (6 sc, dec)*5, 3 sc (42)
24. (5 sc, dec)*6 (36)
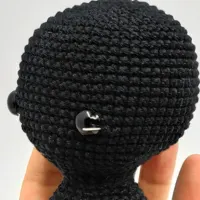
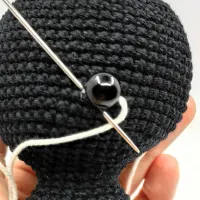
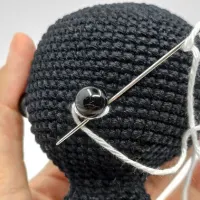
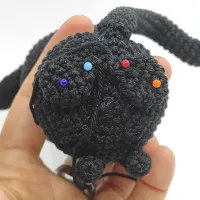
Insert safety eyes between rows 19-20, 12 sts apart from each other.
25. 2 sc, dec, (4 sc, dec)*5, 2 sc (30)
Stuff the toy.
26. (3 sc, dec)*6 (24)
27. (2 sc, dec)*6 (18)
28-29. sc in every sts across (2 rows) (18)
30. (2 sc, inc)*6 (24)
31. (3 sc, inc)*6 (30)
32. sc into every sts across (30)
33. 2 sc, inc, (4 sc, inc)*5, 2 sc (36)
34. (5 sc, inc)*6 (42)
35. sc into every sts across (42)
36. 3 sc, inc, (6 sc, inc)*5, 3 sc (48)
37-42. sc into every sts across (48) (6 rows)
43. 3 sc, dec, (6sc, dec)*5, 3 sc (42)
44. (5 sc, dec)*6 (36)
45. 2 sc, dec, (4 sc, dec)*5, 2 sc (30)
Stuff the toy.
46. (3 sc, dec)*6 (24)
47. (2sc, dec)*6 (18)
48. (sc, dec)*6 (12)
49. dec*6 (6)
Fasten off and weave in the ends.
Embroidering the eyes
With white yarn embroider the eyes, as shown on the pictures.
.webp)
EARS - make two pieces
Start: with black yarn make a magic ring.
1. 6 sc into a magic ring (6)
2. (sc, inc)*3 (9)
3. sc into every sts across (9)
4. (2 sc, inc)*3 (12)
5. sc into every sts across (12)
6. (3 sc, inc)*3 (15)
7. sc into every sts (15)
8. (4 sc, inc)*3 (18)
9. sc into every sts across (18)
10. (5 sc, inc)*3 (21)
11. sc into every sts across (21)
12. (6 sc, inc)*3 (24)
13. Fold int half, crochet together with 12 sc (12)
Cut the yarn, leave a long tail for sewing.
Pin the ears to the head between rows 4-9, sew it.
.webp)
.webp)
Tail
Start: with black yarn make a magic ring.
1. 6 sc into a magic ring (6)
2. (sc, inc)*3 (9)
3-34. sc into every sts across (9) (32 rounds)
Twist two strands of chenille wire to a size that will fit the tail, insert it.
Sew the tail to the cat.
.webp)
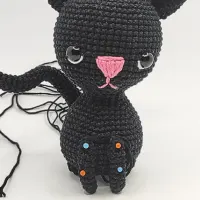
Embroidering the nose
Mark the position for the nose and fill it. Once the nose is complete, embroider the mouth, following the details shown in the pictures.
.webp)
.webp)
.webp)
.webp)
.webp)
.webp)
.webp)
BACK LEGS - make two pieces
Start: with black yarn make a magic ring.
1. 6 sc into a magic ring (6)
2. inc*6 (12)
3-4. sc into every sts across (12) (2 rounds)
5. dec*6 (6)
6. Fold in half, and crochet together with 2 sc.
Cut the yarn, and leave a long tail for sewing.
FRONT LEGS - make two pieces
Start: with black yarn make a magic ring.
1. 6 sc into a magic ring (6)
2-9. sc into every sts across (6) (8 rounds)
Cut the yarn, and leave a long tail for sewing.
Sew the legs to the body. Pin the front legs starting from the 37th row of the body, and sew them. Pin the back legs to the bottom of the cat in the marked places, and sew them.
Well done! You've completed your crochet project!
I hope you enjoyed crocheting your cute amigurumi, now it’s time to share your adorable creation with the world! Tag your photos with #yarnacadabra so we can all admire your work—your support means the world to me! 💛 If you have any questions, spot an error, or just want to say hi, feel free to reach out.
If you loved making this doll, check out my Patreon for more exclusive patterns and behind-the-scenes updates. Also, don’t forget to follow me on Instagram, Facebook, or Pinterest for more crochet inspiration and updates!
Happy crocheting! 😊
Zsuzsa